

Face Painting Tips at Halloween
Halloween is the busiest week of the year for a face painter — and the one night everybody else has a go too.
These are the tips we give across the counter at our Wantirna South warehouse every October: what actually works, what quietly ruins a good design, and what to buy. Everything linked on this page is a live product in stock right now.
Three Halloween looks, step by step
The classic skull — 10 minutes, two colours
- Lay the white base. Sponge strong white over the whole face in two thin passes, stopping just under the jawline so there is no hard edge at the neck. Let it dry completely.
- Block the eye sockets. Fill both sockets solid black and carry the shape up towards the brow bone. Go bigger and darker than feels correct — this is the part that disappears under party lighting.
- Nose and teeth. A small black triangle over the tip of the nose, then vertical stitch lines across both lips and out towards the cheeks. Keep the lines slightly uneven; perfect teeth look like a cartoon.
- Shade the hollows. Soften a little black under the cheekbones and at the temples with a barely-loaded sponge. That is what turns a flat white face into a skull.
What you need: TAG Strong White 32g, TAG Strong Black 32g, a half moon sponge, the Heart Face Art brush essentials and, if you want the shortcut, the H06 Funny Bones stencil.
The zombie — 45 minutes, most of it drying time
- Build the torn skin. Stipple liquid latex onto the cheek or forehead with a sponge, let it dry fully, then gently roll or tear the edges to lift a flap. Tissue pressed into a second layer gives it more depth.
- Kill the colour. Pale the whole face with white, then mottle sickly green and grey over it with a stipple sponge. Never wipe — dab, so the skin stays uneven.
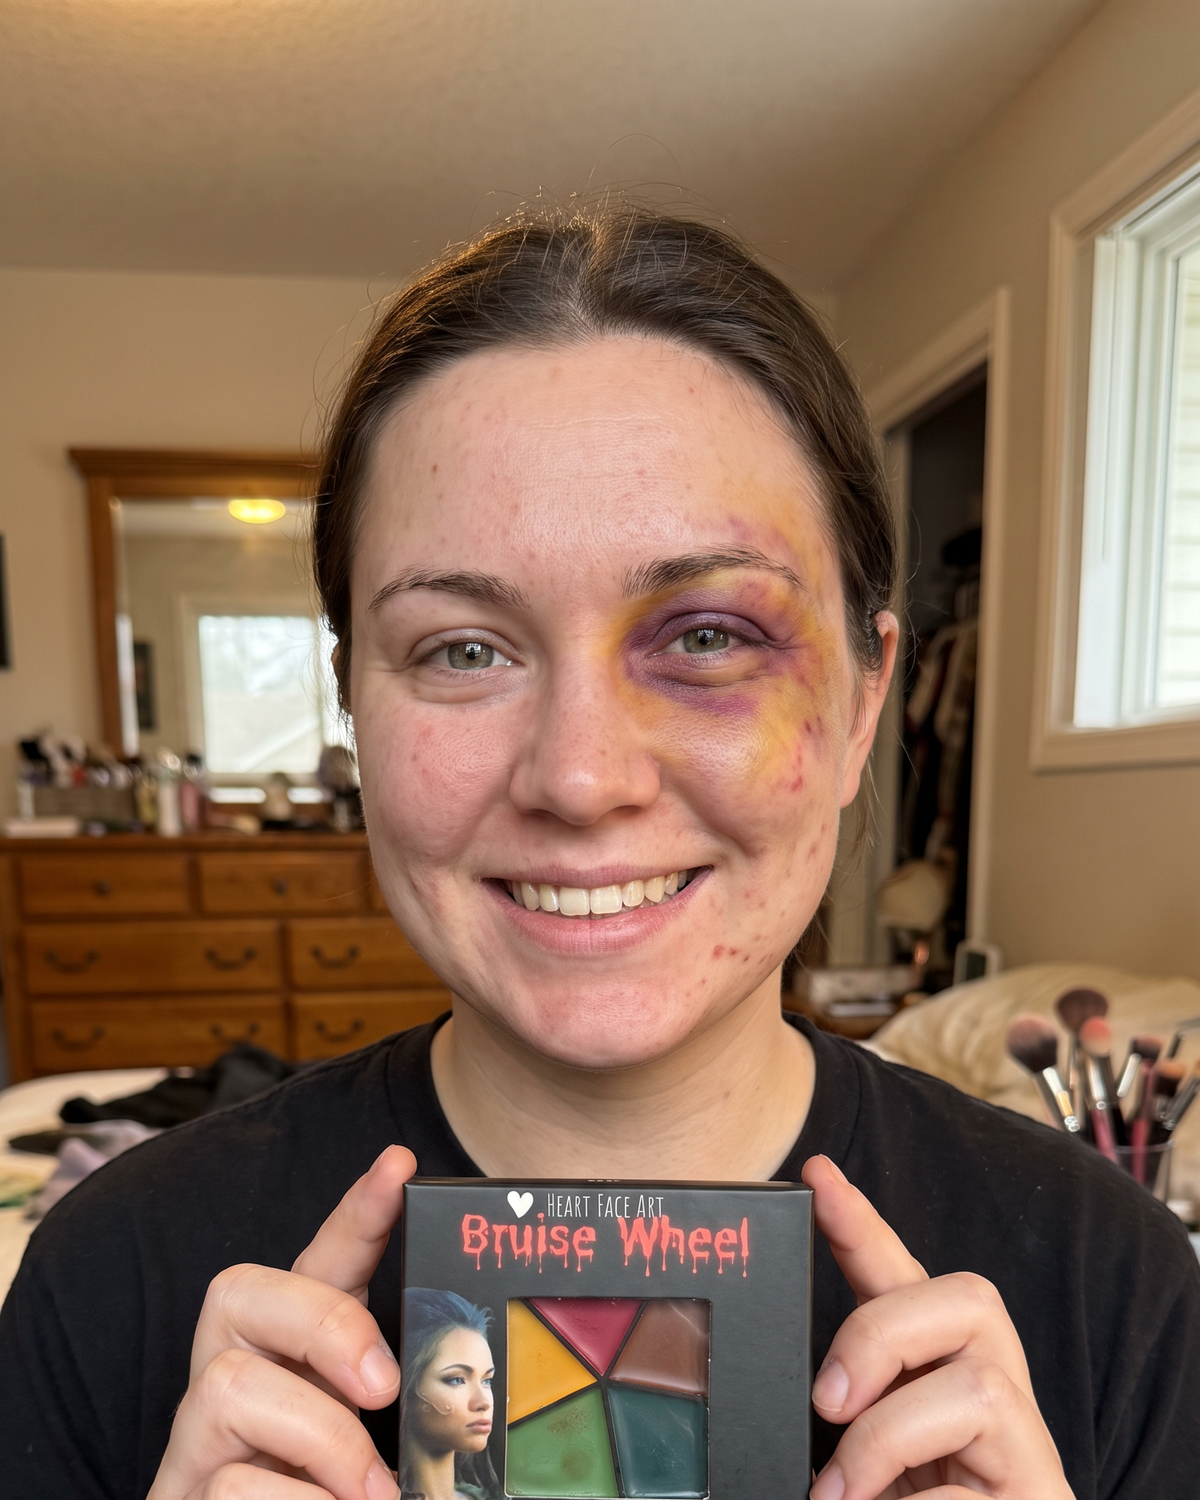
- Rot and bruise. Work purple, yellow and green from a bruise wheel around the eyes, jaw and the edges of the wound. Paint deep red raw inside the torn section.
- Blood and finish. Coagulated blood inside the wound, a little fresh stage blood running down from the edge, and decayed teeth. Grey contact lenses finish it if you have them.
What you need: Liquid Latex 30ml, a stipple sponge, the SFX Bruise Palette Wheel, coagulated blood, stage blood and Tooth FX Nicotine / Decay. Full walkthrough: zombie face paint.
The vampire — 20 minutes, highest impact for least effort
- Drain the colour. A pale base a few shades lighter than your own skin. Do not go pure white — that reads as a mime, not a vampire.
- Put the shadow back. Grey and purple in the eye sockets, under the cheekbones and at the temples. Paleness only looks drained when there is depth underneath it.
- The bite. Two punctures about two centimetres apart, on the side of the neck following the muscle — never dead centre. Build them slightly raised with modelling wax and bruise the skin around them.
- The blood. Coagulated blood in the punctures, then a thin trail of fresh stage blood running downward so gravity looks right. Strong red lips, bloodied teeth, done.
What you need: Creamblend Stick in White, the SFX Bruise Palette Wheel, modelling putty / wax, Diamond FX Essential Red and Tooth FX Blood Red. Full walkthrough: vampire makeup for Halloween.
Painting a queue this Halloween? Work in one colour across everyone before you switch — whites first, then colour, then black. You will paint twice as many faces, and every one of them will be cleaner. Keep one sponge per colour, a second water pot purely for rinsing, and scary stencils on the table to keep the line moving. Painting children rather than one costume? Start with our kids Halloween face paint guide.
Halloween is coming
Our Halloween range sells down fast through October — fake blood, liquid latex and costume lenses always go first.
Ten tips that change how your Halloween paint looks

1. Start on clean, dry, oil-free skin
Moisturiser and sunscreen are the two biggest reasons Halloween makeup slides off by 9pm. Wash, pat dry, and leave the skin bare for ten minutes before you start.

2. Use far less water than you think
Loaded paint should look like thin cream, not milk. Too much water is the single most common cause of patchy, streaky bases that never properly dry.

3. Two thin layers beat one thick one
Thick paint cracks around the mouth and eyes within an hour. Build coverage gradually and the finish stays smooth all night.

4. Let each layer dry before the next
Water-based paint is touch-dry in under a minute. Rushing it lifts the colour underneath and turns crisp black linework into muddy grey.

5. Do your black last
Black travels. Lay down white, colour and shading first, let it set, then come back in with black detail. Your whites stay white.

6. A stipple sponge is the biggest upgrade you can buy
No other small purchase changes a face this much. Dab it, never wipe it, for stubble, decay, mottled skin and instant bruising.
Making it look real, making it last, getting it off

7. Asymmetry is what sells realism
Real injuries are never symmetrical. Put the wound on one side, off-centre, and follow the natural lines and hollows of the face.

8. Push your shadows darker than looks right
Under party lighting and phone flash, subtle shading disappears completely. What looks overdone in the bathroom mirror reads perfectly across a room.

9. Seal it, because Halloween here is spring
A barrier spray before you paint and again at the end is the difference between a look that survives a warm Australian night and one that does not.

10. Buy the remover at the same time as the latex
Spirit gum and prosthetics need a proper remover. It is the step people forget, and the one that turns a great night into a painful morning.
Shop by effect


Halloween best sellers
The products Australian face painters and SFX artists reorder every October.


TAG Body Art Face Paint Cake 32g - White
Choose your option


TAG Body Art Face Paint Cake 32g - Black
Choose your option

Heart Face Art Premium Half Moon Face Painting Sponge (SINGLE)
Choose your option
TAG Body Art Face Paint Cake 32g - Strong White
Choose your option


Fusion Body Art Face Paint Cake Prime - Strong Black 32g
Choose your option


Diamond FX 30g Face Paint Cake - Essential White
Choose your option


Fusion Body Art Face Paint Cake Prime - Prime White 32g
Choose your option
TAG Body Art Face Paint Cake 32g - Strong Black
Choose your option


Heart Face Art Premium Petal Sponge (3 Pack)
Choose your option


Diamond FX 90g Face Paint Cake - Essential White
Choose your option
Skin safety, and getting it all off again
Every product we sell is cosmetic grade and made for skin — but Halloween is the one night of the year people reach for things they have never used before. Three rules cover almost everything that goes wrong.
Patch test 24 hours before, every time
A small amount on the inside of the elbow, left overnight. This matters most with liquid latex, which contains natural rubber latex and is the product people most often react to. With a known latex allergy, use modelling wax or a premade prosthetic instead.
Never use craft or acrylic paint on skin
It is not formulated for faces, it does not come off easily, and it is the usual culprit behind the horror stories.
Plan the removal before you start
Warm water and a gentle cleanser for water-based paint, cleansing oil or micellar water for cream and SFX products, and a dedicated remover for spirit gum. Peel latex slowly after loosening the edges with warm soapy water — never dry.
Halloween face painting questions
What face paint should I use for Halloween?
What face paint should I use for Halloween?
Use cosmetic-grade, water-based face paint made for skin — never craft paint, acrylic or poster paint. For Halloween specifically, a strong white and a strong black will cover the majority of designs, because skulls, skeletons, zombies, ghosts and Day of the Dead are all built on a black and white base with colour added on top.
How do I stop Halloween face paint cracking or sliding off?
How do I stop Halloween face paint cracking or sliding off?
Three things cause it: oily skin, too much water in the paint, and layers that are too thick. Start on clean, dry skin with no moisturiser or sunscreen, keep your loaded paint at the consistency of thin cream, build two thin layers rather than one heavy one, and seal the finished look with a barrier spray.
What is the easiest scary Halloween face paint for a beginner?
What is the easiest scary Halloween face paint for a beginner?
A classic skull. Sponge a white base over the whole face, fill the eye sockets solid black, add a small black triangle over the nose and stitch lines across the lips. Two colours, about ten minutes, and it reads clearly from right across a room.
How do I make a fake wound look real?
How do I make a fake wound look real?
Build the shape first with liquid latex or scar wax, then colour it: deep red inside, purple and yellow bruising around the outside from a bruise wheel, and the outer edges blended into your own skin tone so there is no hard line. Finish with coagulated blood inside the wound and a little fresh stage blood at the edge. The blending is what sells it, not the blood.
Is Halloween face paint safe for kids?
Is Halloween face paint safe for kids?
Cosmetic-grade, water-based face paint is formulated for use on skin, including children’s skin. Always patch test on the inside of the elbow the day before, avoid the eye area and any broken or irritated skin, and stop immediately if there is redness or itching. We would avoid liquid latex and heavy SFX products on very young children.
How do I get Halloween face paint off?
How do I get Halloween face paint off?
Warm water, a gentle soap or cleanser and a soft cloth will remove water-based paint — work gently rather than scrubbing. Cream products and SFX makeup lift more easily with a cleansing oil or micellar water first. Liquid latex should be loosened with warm soapy water and peeled slowly, never pulled off dry. Spirit gum needs a dedicated spirit gum remover.
When should I order my Halloween face paint?
When should I order my Halloween face paint?
As early as you can. Our Halloween range sells down through October and fake blood, liquid latex and costume lenses are always the first to go. If you need something specific for the night, ordering in early October is far safer than the final week. Australian orders over $115 ship free.
Do you sell Halloween face paint in Melbourne?
Do you sell Halloween face paint in Melbourne?
Yes. The Face Paint Shop is Australia’s largest face paint warehouse and you can shop the full Halloween range in person at 1/1 Sherwood Court, Wantirna South VIC 3152, Monday to Friday 10am–4pm and Saturday 11am–2pm. We also ship Australia-wide.
More Halloween guides
Every design on this page is covered in more depth in our Halloween guides.
Australia’s largest face paint warehouse
Shop in store at 1/1 Sherwood Court, Wantirna South VIC 3152 — Monday to Friday 10am–4pm, Saturday 11am–2pm — or order online for delivery Australia-wide. Free Australian shipping on orders over $115.